CosyVoice Open Source Address: https://github.com/FunAudioLLM/CosyVoice
CosyVoice-api Open Source Address: https://github.com/jianchang512/cosyvoice-api
Supports Chinese, English, Japanese, Korean, Cantonese. The corresponding language codes are
zh|en|jp|ko|yue
Using in Video Translation Software

- First, upgrade the software to 2.08+
- Ensure that the CosyVoice project has been deployed, the api.py from CosyVoice-api has been placed, and api.py has been successfully started (API service must be started for use in the translation software).
- Open the video translation software, go to Settings (top left) -- CosyVoice: fill in the API address, the default is
http://127.0.0.1:9233 - Fill in the reference audio and the text corresponding to the audio
Reference audio format:

Each line is separated into two parts by the # symbol. The first part is the path to the WAV audio, and the second part is the corresponding text content. Multiple lines can be filled in.

The optimal duration for WAV audio is 5-15 seconds. If the audio is placed in the root directory of the CosyVoice project (i.e., the same directory as webui.py), simply fill in the name here.
If it is placed in the wavs directory under the root directory, you need to fill in wavs/audio_name.wav

Example of reference audio format:

1.wav#Hello dear friends
wavs/2.wav#Hello friends- After filling in, select CosyVoice as the dubbing channel and the corresponding role in the main interface. Among them, the clone role is to copy the voice from the original video.
For other systems, please deploy CosyVoice first. The specific deployment method is as follows:
Source Code Deployment of the Official CosyVoice Project
Deployment uses conda, and this method is highly recommended, otherwise it may not be successfully installed, and there will be many problems. Some dependencies cannot be successfully installed on Windows using pip, such as
pynini.
1. Download and install miniconda
miniconda is a conda management software. It is very convenient to install on Windows, just like ordinary software, just click next to complete it.
Download address: https://docs.anaconda.com/miniconda/

After the download is complete, double-click the exe file


The only thing to pay attention to is that on the following interface, you need to select the top 2 check boxes, otherwise the subsequent operations will be a bit troublesome. The second box selected means "Add the conda command to the system environment variable". If you do not select it, you will not be able to directly use the conda short command.

Then click "install" and wait for it to complete and close.
2. Download CosyVoice source code
First create an empty directory, such as creating a folder D:/py on the D drive. The following will be explained using this as an example.
Open the CosyVoice open source address: https://github.com/FunAudioLLM/CosyVoice

After downloading and decompressing, copy all the files in the CosyVoice-main directory to D:/py.


3. Create a virtual environment and activate it
Enter the D:/py folder, enter cmd in the address bar and press Enter. This will open a cmd black window.

Enter the command conda create -n cosyvoice python=3.10 in the window and press Enter, which will create a virtual environment named "cosyvoice" with a python version of "3.10".

Continue to enter the command conda activate cosyvoice and press Enter, which will activate the virtual environment. Only after activation can you continue to perform operations such as installation and startup, otherwise it will inevitably be wrong.

The sign of activation is that the command line starts with a "(cosyvoice)" character.

4. Install the pynini module
This module can only be installed using the conda command under Windows, which is why it is recommended to use conda on Windows at the beginning.
Continue to enter the command conda install -y -c conda-forge pynini==2.1.5 WeTextProcessing==1.0.3 in the cmd window that was opened and activated above and press Enter.

Note: A prompt asking for confirmation will appear during the installation. At this time, enter y and press Enter, as shown in the figure below.

5. Install other dependencies, using Alibaba Cloud mirror
Open the
requirements.txtfile and delete the last lineWeTextProcessing==1.0.3, otherwise the installation will definitely fail, because this module depends onpynini, and pynini cannot be installed under Windows pip.Then add 3 lines to requirements.txt:
Matcha-TTS,flask, andwaitress.

Continue to enter the command pip install -r requirements.txt -i https://mirrors.aliyun.com/pypi/simple/ --trusted-host=mirrors.aliyun.com and press Enter. After a long time, the installation will be successful without any accidents.
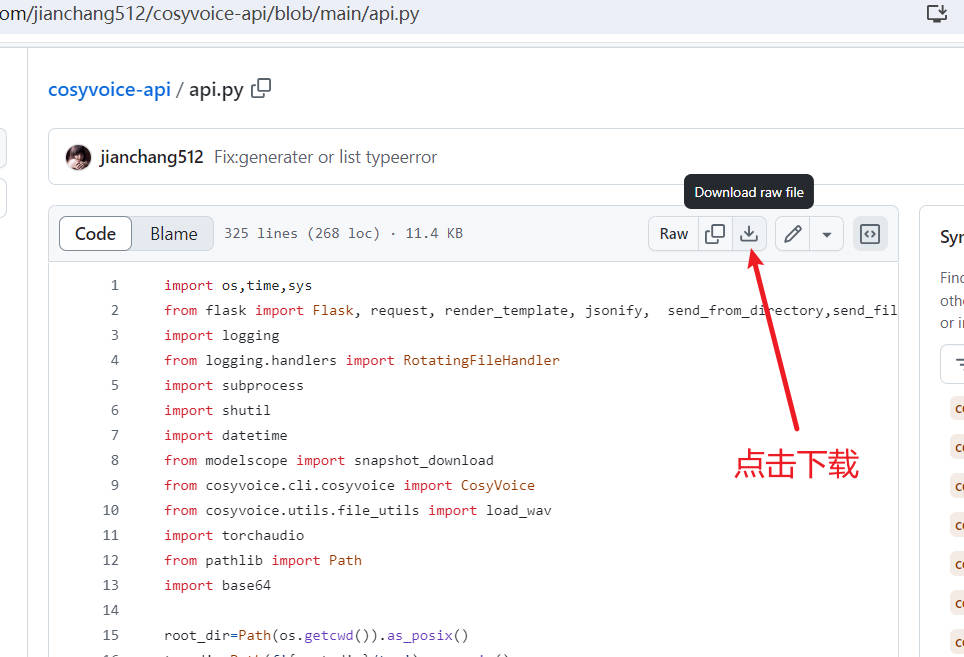
6. Download the api.py file and place it in the project
Go to this address https://github.com/jianchang512/cosyvoice-api/blob/main/api.py to download the api.py file, and place it together with webui.py after downloading.

Start API service
API interface address:
http://127.0.0.1:9233
Enter the command and press Enter to execute python api.py

API interface list
Synthesize text according to built-in roles
Interface address: /tts
Simply synthesize text into speech, without voice cloning
Required parameters:
text: The text that needs to be synthesized into speech
role: Choose one of 'Chinese Female', 'Chinese Male', 'Japanese Male', 'Cantonese Female', 'English Female', 'English Male', 'Korean Female'
Successful return: WAV audio data
Sample code
data={
    "text":"Hello dear friends",
    "reference_audio":"10.wav"
}

response=requests.post(f'http://127.0.0.1:9933/tts',data=data,timeout=3600)Same language clone voice synthesis
- Address: /clone_eq
The pronunciation language of the reference audio is consistent with the language of the text to be synthesized. For example, the reference audio is in Chinese, and the Chinese text needs to be synthesized into speech according to the audio.
- Required parameters:
text: The text that needs to be synthesized into speech
reference_audio: The reference audio that needs to clone the voice The path of the reference audio relative to api.py. For example, to reference 1.wav, this file is in the same folder as api.py, then fill in 1.wav
reference_text: The text content corresponding to the reference audio
Successful return: WAV data
Sample code
data={
    "text":"Hello dear friends.",
    "reference_audio":"10.wav",
    "reference_text":"I hope you are doing better than me."
}

response=requests.post(f'http://127.0.0.1:9933/tts',data=data,timeout=3600)Different language voice cloning:
- Address: /cone
The pronunciation language of the reference audio is different from the language of the text to be synthesized. For example, you need to synthesize a piece of English text into speech based on a reference audio with Chinese pronunciation.
- Required parameters:
text: The text that needs to be synthesized into speech
reference_audio: The reference audio that needs to clone the voice The path of the reference audio relative to api.py. For example, to reference 1.wav, this file is in the same folder as api.py, then fill in 1.wav
Successful return: WAV data
Sample code
data={
    "text":"I received a birthday present from a close friend from afar, and my heart was filled with sweet joy from the unexpected surprise and deep blessings! .",
    "reference_audio":"10.wav"
}

response=requests.post(f'http://127.0.0.1:9933/tts',data=data,timeout=3600)Compatible with openai tts
- Interface address: /v1/audio/speech
- Request method: POST
- Request type: Content-Type: application/json
- Request parameters
input: The text to be synthesizedmodel: Fixed tts-1, compatible with openai parameters, but not actually usedspeed: Speech rate, default is 1.0reponse_format: Return format, fixed WAV audio datavoice: Only used for text synthesis, take one of the following 'Chinese Female', 'Chinese Male', 'Japanese Male', 'Cantonese Female', 'English Female', 'English Male', 'Korean Female'
When used for cloning, fill in the path of the referenced reference audio relative to api.py. For example, to reference 1.wav, this file is in the same folder as api.py, then fill in
1.wav
- Sample code
from openai import OpenAI

client = OpenAI(api_key='12314', base_url='http://127.0.0.1:9933/v1')
with  client.audio.speech.with_streaming_response.create(
                    model='tts-1',
                    voice='中文女',
                    input='Hello, dear friends',
                    speed=1.0
                ) as response:
    with open('./test.wav', 'wb') as f:
       for chunk in response.iter_bytes():
            f.write(chunk)